


How to set up a Fish Only aquarium?
The abbreviation FO aquarium (fish only) an Anglo-Saxon expression used in to designate a marine aquarium. For this purpose here will represent a seawater aquarium with fish only, but without corals and invertebrates. Tanks with corals require more knowledge and patience, as the physicochemical qualities of the water will be very different no matter what you do. The main advantage of FO is that it gives you a very wide choice of fish.
However an FO does not necessarily mean more fish, but rather to breed incompatible fish in the reef (As for example the emperor angels).
To learn more about reef aquariums: XXX
Unlike freshwater, if you are purchasing a standard aquarium there will be some additional purchases to be expected.
ASSEMBLY OF A FISH ONLY AQUARIUM
- Site
- Choice of aquarium
- Preparing the aquarium
- Equipment installation
- Installing the substrate
- Filling the aquarium
- Decor placement
- Processing period
- Introduction of aquatic organisms
1. LOCATION
Determine where you will set up the aquarium.The location is ideal if nothing is blocking your view and so you can fully enjoy the beauty and serenity of your new aquarium.
Do not place your aquarium:
- in a room exposed to drafts (do not place it near doors or air vents to prevent unwanted temperature changes);
- near a heater (radiator);
- near a window;
- in a place where it will be directly exposed to the sun;
- in a room where the temperature is not constant, such as the kitchen;
- in a room where the temperature is too hot or too cold, or where there is a lot of traffic.
If possible, locate your aquarium near a ground fault interrupter and water source.
Additionally, a filled aquarium weighs approximately 1.19 kg per liter (10 lbs per gallon), in addition to the original aquarium weight and stand or cabinet, so make sure the floor is level and can support this weight.
Note: Make sure there is enough room behind and around the aquarium to place equipment, such as tubing and wire, for maintenance and cleaning.
2. CHOICE OF AQUARIUM
For your first aquarium, the easiest way would be to buy a ready-to-use tank called plug & play.
The first step if you do not opt for a plug & play bin is the choice of the bin, there is a whole range of different materials and shapes (glued, molded, classic, cylindrical glass, wood, polyester resin ...) glass glued is the most common and recommended in seawater, aquariums with steel or aluminum fittings should be avoided here because of the corrosion caused by salt water. We would tend to think that to start, it is better to have a low volume tank, FALSE, the smaller the volume, the harder the balance is to achieve and especially to keep, the minimum would be the standard of 200 liters, but 250 to 350 liters is perfect for beginners, on the other hand, the aquarium hobby has evolved a lot in recent years, and the equipment has become much more efficient, which makes it possible to make perhaps a 100 liters a little easier than 10 or 15 years ago (by the way, 10 or 15 years ago, it was inconceivable to attempt a tank of seawater in 100 liters).
Advice : Choose a cabinet in which you can place your equipment and other tools.
Note: A large surface area provides excellent gas exchange and superior water quality, so beware of tall or irregularly shaped aquariums, which have a small surface area compared to regular shaped aquariums.
3. PREPARATION OF THE AQUARIUM
Before starting to set up the aquarium, gently clean it with a clean, damp cloth, then rinse it with lukewarm water. Never use bleach, commercial glass cleaners, detergents, or commercial chemical cleaners to clean interior and exterior walls. Also, do not use a bucket that has contained soap, detergent or any other chemical to transport water to your aquarium.Once your aquarium has been cleaned well, you can place your background, if you have decided to have one.
Reasons to install a background:
- It hides the electrical wires and pipes at the back of the aquarium.
- It brings depth and visual contrast with fish and live rocks.
- It provides a nice finishing touch.
It is recommended, especially for aquariums built by an amateur, to check its tightness by filling it for the first time for 24 hours, then emptying it after having checked that no leaks are present before proceeding with the final installation.
4. EQUIPMENT INSTALLATION
Make sure that all the equipment you purchase is designed for saltwater aquariums. As mentioned above, the type of equipment you will need will depend on what you choose to put in your aquarium.
The basic equipment includes:
- Protein skimmer / filter
- Water heater and thermometer
- Circulation pump / power head
- Lighting
Skimmer
In addition to fresh water, you will need a skimmer here, although fish only can be dispensed with, it is still highly recommended, it will become mandatory anyway if you buy species sensitive to nitrogenous products. The skimmer removes the proteins in the water even before they degrade and the living stones act as a denitrator by harboring a very large number of anaerobic bacteria (living without oxygen) which will transform the nitrates into gaseous nitrogen.
Filtration
Unlike a reef, mechanical filtration can be useful in OF because in this type of tank, the so-called "Berlin" method will be more difficult to keep if you are overcrowded. You should therefore choose a relatively large filter, the filters sold with freshwater aquariums are usually too small, so it will be useful to add a second one, for example an internal settling tank. If your OF is done for the purpose of keeping incompatible fish in the reef, but remaining sparsely populated, then the filter will not be useful.
In the filters, it will be necessary to add foams for mechanical filtration, ceramics for biological filtration, or even temporarily activated carbon if necessary for chemical filtration. The order of the filtration masses is simple, if you have several sizes of foams (do not hesitate to combine several different layers), go from the largest upstream to the finest downstream, the perlon and to put upstream of the filtration because it is in fact a pre-filtration but it goes just as well downstream or this time it operates as a fine filtration.
If you have two filters, put the foams (mechanical filtration) in one, and the ceramics (biological filtration) in the other.
You can also find filtration "biochemical sand" from good aquarium vendors which has the utility of keeping the PH at a high level, which adds chemical filtration to your mechanical and biological filtration system.
Heaters
For heating, there is 1 watt / liter of water, preferably choose an immersion heater because they are very easy to use and widespread.
Brewing
Fish-only brewing should be a minimum of 15 times the tank volume per hour. If your aquarium is a pre-equipped aquarium as standard, it will certainly be necessary to add stirring pumps (Do not confuse the stirring pump and the delivery pump, the stirring pumps are only used for stirring as their name suggests, and the rotor is replaced by a propeller).
Lighting
Then comes the lighting, the power will be mainly according to the size of your tank, for a fish only, you can use T8, T5 or led neon lights (see even HQI if you have some, but it is not an obligation for the needs of the tank), the T5 are relatively powerful, so it is an advantage because this is what a seawater tank requires, to have an idea of the lighting power in fish only, it is necessary to base oneself on a minimum of 1 watt for 3 liters (going up to a maximum of 1 watt per liter), below this power of 1 watts / 3litres, the coralline (pink calcareous algae) will be difficult to grow on living rocks.
Today the new technology brings more powerful led ramps which consume less energy
DID YOU KNOW?
- The lighting duration will be 10 to 12 hours / day. For more details on the powers of neon tubes as well as the dimensions of standard aquariums.
- The ideal temperature for a reef aquarium is between 22.2 ° C and 25.5 ° C (72 ° F and 78 ° F). The intense lighting used with a reef aquarium can produce a lot of heat.
- If you have a settling tank, insert the skimmer and the immersion heater into it on the water inlet side, otherwise glue the immersion heater using the suction cups against the rear face if possible in the direction of the current. will perform your water pumps (The glass of the immersion heater must not be in contact with the ground or with the glass).
5. SUBSTRATE INSTALLATION (OPTIONAL)
For your marine aquarium, the choice of soil is simpler because there is coral sand, advantageous in all aspects, aesthetic, helps to maintain the PH, fairly light and not too compact. Calculate the quantity to buy in volume (Width x Height x Length), You will get the volume in liters by calculating the dimensions in centimeters and dividing the total by 1000. Install a layer of sand with a height of 3 to 5 centimeters.
Before introducing your coral sand, you must wash it, to do this, fill a bucket with 1/3 of gravel and mix it under the flow of the tap, until the water is clear (it takes sometimes time, but it is important that the sand is very clean and free of impurities), pass all the coral sand this way. Do not do this method if you introduce live sand
In all cases, the sand will be added only after the installation of the live stones because it is imperative that these stones rest directly on the back pane, or even on a specific support, but in no case placed on a layer of sand. , the reason is simple, many invertebrates dig in the sand, if they were to dig in the sand, under the living stones, there would be a big risk of landslide with all the consequences that this implies.
6. FILLING THE AQUARIUM
Before starting the filling, you must install all the equipment and choose the right salt, namely that there are salts for reef and for fish only. So you have to choose the right salt.
7. PLACEMENT OF THE DECOR
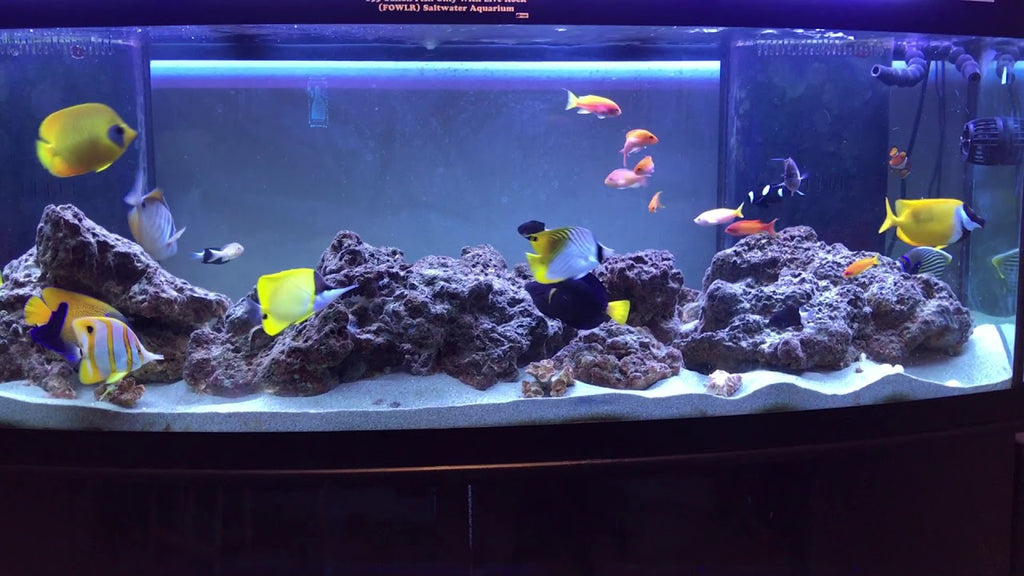
The decor will mainly consist of living stones or basic rock (non-living stone) these stones have a lot of advantages and play an important role in the ecosystem. They harbor aerobic bacteria on their surface and deeper anaerobic bacteria capable of transforming nitrates into gaseous nitrogen, they are also excellent supports for fixing corals, and they will become covered with coralline (pink calcareous algae), which helps keep a clean bin. If you are stacking, be careful that it is stable and does not fall over. Take into account that the starting time will be longer with base rock.
The quantity of live stones should be in the order of 1 to 1.5 kg for approximately 10 liters of water in fish only. A stack of living stones up to the upper water level is the most beautiful effect.
You must also install them in full, once the tank has been balanced and the nitrogen cycle has begun, any addition of live stones is strongly discouraged, otherwise there will be a significant increase in ammonia (NH3) followed by nitrites (NO2) , followed by disaster ...
The name of living stones comes from the fact that they are colonized by all kinds of microplankton, bacteria, sponges etc ... which gives them a unique purifying power, it is very important not to subject them to thermal shock and osmotic, so do not put in a container which is not yet at temperature or which is not yet salted, likewise during transport between your seller and at home, they must not dry out or even remain outside. water too long (say 1 hour maximum, beyond, it is imperative to cover them with a damp cloth). If these rules are not respected, they will lose their colonization, the tank will have great difficulty in equilibrating, and the time to colonize will be very long, several months, and even more, on condition of having a strain in good condition. . The life of the tank depends on their condition, moreover and for the continuation, for all treatments, it is necessary to ensure that the product used is studied to be administered in this type of tank, all copper-based treatments for example are very dangerous for living stones and reduce their colonization to nothing.
Ideally place the rocks according to the mixing to limit the accumulation of sediment. Example in the mediums with hiding places and hollows under the rocks (do not pile the rocks on the walls of the bottom by risk of still creating sedimentation. Which could suffocate the rocks.
As for the filling, again there are two solutions for this operation, the first, faster is to do it just after adding the live stones, and the second and which is but longer, and to add this sand only two or three months after starting your aquarium. The reason for this useful wait is very simple, the newly imported live stones will sediment a lot, and as a result, the sedimentation will fall to the bottom of the tank, you can then remove it easily and regularly by suction, something impossible with the sand in square. The massive sedimentation of the stones usually lasts between 2 and 6 months, but sometimes more, then the living stones equilibrate and stabilize, therefore, sediment much less.
8. TREATMENT PERIOD
A marine aquarium will necessarily go through a phase of inferior and primitive algae of all kinds when starting the tank, ranging from brown algae lining the living stones and the ground to green algae encrusting the windows through filamentous algae ... This phase, sometimes quite disgusting should not discourage you, it is a temporary passage, almost useful but also a sign of the good establishment of the ecosystem, these algae will appear a few days after the impoundment, they will develop very quickly and will cover practically everything in the tank, so they will thrive for a few days to a few weeks, then one day (2, 3 or even 4 weeks the start of their development), you will quickly notice that they start to disappear, and this almost as quickly as they appeared, day by day, you will see the decorations get rid of these algae. So, there is no need to alarm yourself when you see it and try at all costs to eliminate them.
Once your tank is full, you will have to be patient, To know the value of a particular element (NO2, PH ...) there are colorimetric tests in all aquarium stores, ready to use, To know more important, the nitrite N02 test, it is on it that the wait will depend before adding your first inhabitants, there is no fixed deadline, it can go from 15 to 60 days in sea water, I advice to do the test once a week, starting on the 10th day after entering the water.
At first, the test will show 0mg / l, this is normal, after 10 days the cycle cannot be finished, it surely has not even started, testing every two days, will come a time or you will find that the color you usually get will start to turn, this is the start of the cycle, from there day by day you will see the value increase, then day by day will drop back down to 0, like at the start, and your nitrogen cycle will start, but be careful, very fragile at the beginning and also very quickly unbalanced. For the tests to have, the basis is to have a PH test which must be maintained at around 8.3 and you will also need an NO2 test (nitrites) always at 0, one of NO3 nitrates to be kept as low as possible, a KH test, calcium (Ca) to be maintained between 400 and 450 mg / l and a magnesium test (Mg) to be held between 1250 and 1350 mg / l, these are essential, also have the PO4 (phosphate) test and NH3 (ammonia) can only be better.
The KH, it must be 8 to 10
Small important points to know during the launch:
The skimmer needs a break-in period, it will not function properly on start-up, this is completely normal. On the first day, it may release a lot of microbubbles into the tank and the foam will be very clear. As the days go by, as this forms of the "patina" which will help the water to "glide", it will work better and better. Its break-in period can last from 1 to 3 weeks depending on the type of tank, the type of skimmer and what is in the aquarium.
9. INTRODUCTION OF AQUATIC ORGANISMS
The first ones alive, when the cycle is over. We must introduce the first living (snails, crabs, sea urchins etc.). They will help maintain the aquarium and let you see if your aquarium is ready for fish.
10. MAINTENANCE AND FOLLOW-UP
Maintenance of an OF must be regular, every week
20% water change per month
The water evaporation must be supplemented daily (to avoid variations in salinity) by osmosis water, above all do not add salt water as compensation, otherwise your salinity would increase very quickly, logical because just l H2O water evaporates, and salt does not.
After 6 months, check electrical devices such as the operation of water pumps, temperature, control of scum, cleaning of neon tubes, HQI, T5 or led etc ...
-Temperature: 26 ° c (range from 25 ° c to 28 ° c)
-PH: 8.1 (range 7.9 to 8.3)
-Density: 1023 (range from 1022 to 1024)
-Calcium - Ca: 420 mg / l (range from 390 mg / l to 450 mg / l)
-Magnesium - Mg: 1270 (range from 1070 mg / l to 1370 mg / l)
-KH: 7 (range 6 to 12)
-Nitrates -NO3: <10 mg / l (Absolute zero is not necessarily the best, staying between 3 mg / l to 5 mg / l seems preferable)
-Nitrites - NO2: <0.01 mg / l
-Phosphates - PO4: <0.05 mg / l
ABSTRACT
- 1e week placement of equipment and decor (think carefully about the layout because it is difficult to change when the tank is full).
- Wait 1-3 months for the water cycle (tip for speeding up the cycle, add frozen shrimp from the grocery store).
- After the evening cycle is over, the introduction of the clean-up crew.
- One to two weeks after the first alive you will be able to introduce the fish.
- Choosing a selection results in a full page refresh.